Manual vs. Automated Deployment
Although automated deployments are not a new concept, rarely we can set up a pipeline completely to the client’s on-premises environment due to various restrictions regarding security or bureaucracy. When that
is possible, it’s the best practice since it reduces time and effort invested in deployment, as it will be shown below.
Before we switched to automated deployments, the team manually deployed to servers that were not in our network but in our client’s network. That was a complex and error-prone process that was often time-consuming and the whole team sometimes had to spend all day working on it. Deployment automation not only eliminated deployment faults, but greatly accelerated the entire application development process. With automated deployment, which takes only a few minutes, new opportunities have opened for raising the quality of the software itself.
Clients are now more involved in the development process because they get new versions more often. Briefly speaking, switching from manual to automated software deployment to the client has given us more time to develop, faster client feedback and zero annoyance caused by deployment. Without many manual steps that took several hours or longer for completion, deployment has turned into 3 clicks and 6-8 minutes of waiting.
PowerShell or Deployment Groups Automated Deployment
Before Deployment groups, we automated deployments by using complex PowerShell scripts to connect our build machine with clients’ servers and to do an exchange of build artifacts and deployment itself, but sometimes this led to false positive deployments since some PowerShell errors were not caught by our build agent.
Fortunately,
Azure DevOps server has
Deployment Groups which makes this deployment automatization possible and pretty simple, almost as simple as any other build / release process inside your companies’ network. Once you set this up, you have a great, fast and problem-free deployment process: no error messages get lost, no false positive deployments, each build artifact ends up in the place it should end up and it takes only a few minutes.
We managed to get deployment automation done in the following 5 steps.
Step 1: Creating Deployment Group
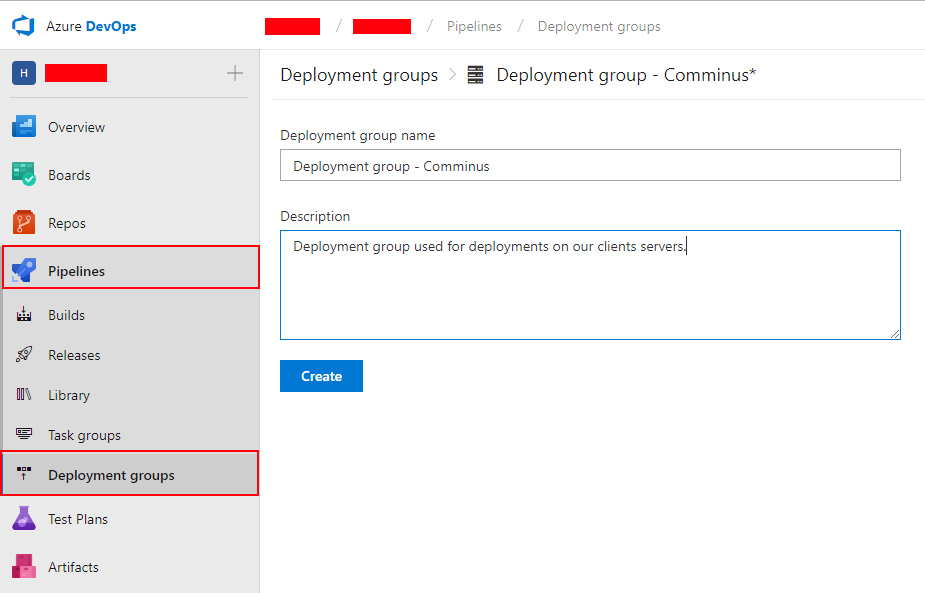
On Azure DevOps, we create a deployment group on Deployment Groups tab of the
Azure Pipelines section. It is very simple: click “New” button, fill in “Deployment group name” and “Description” fields and click “Create” button.

Picture 1: Creating a deployment group form (
source: Microsoft)
Step 2: Preparing PowerShell Script for Registration of Agents
After clicking “Create” button from Step 1, a deployment group is created and its details page is shown:
/DevOps-Behind-the-Rows-How-to-Automate-Deployment/222.png.aspx)
Picture 2: Auto-created PowerShell script for installing and registering a deployment group agent to the deployment group (
source: Microsoft)
The most important thing here is the
PowerShell script which is generated automatically for us. This script needs to be run on each client’s server to which we want to automate deployment. The script downloads and installs an agent on each server it is run on, and registers them to our deployment group.
A note here – this script can be used as it is (without any modifications) if you are adding to the deployment group machines from the same network from which your build machines. But, if you want to add a machine from outside of your Azure DevOps servers network, you need to modify the script in a way which allows communication of that machine and your Azure DevOps server.
In our case, Azure DevOps server is placed behind firewall, so there is no possible way for machine communication with our Azure DevOps server outside our network without having to somehow bypass the firewall.
So, instead of using Azure DevOps URL in PowerShell script, we used a URL of our proxy which allows bypassing the firewall.
Another important thing we had to do is to change authentication type inside PowerShell script – we changed it from “--auth Integrated;” to “--auth PAT –token xxxxxxxxxxxxxxxxxxxxxxxxxxxxxxxxxxxxxxxxxxxxxxxxxxxx;”.
Of course, we created personal access token for this. To do this, in Azure DevOps navigate to your profile -> Security -> Personal access token -> New Token -> for the scope select
Deployment group (read, manage) and make sure all the other boxes are cleared -> Create token.
This is how our final PowerShell script looks like:
/DevOps-Behind-the-Rows-How-to-Automate-Deployment/pic-3-(1).png.aspx)
Picture 3: Final PowerShell script for installing and registering a deployment group agent to the deployment group
(source: Microsoft)
Step 3: Deploying Agents to Deployment Group
Once we set it all up as described above, we are ready for registering agents to our deployment group. For that, we just need to remotely connect to client’s server(s), open PowerShell and run the script you can see above.
After the script succeeds, first check if the agent is installed and registered correctly – navigate to Targets tab of Deployment group and see if the wanted server is listed there. In our case, the screen looks like this:
/DevOps-Behind-the-Rows-How-to-Automate-Deployment/pic-4-(1).png.aspx)
Picture 4: A deployment group agent is installed on a client’s server and it is seen in our deployment group on Azure DevOps server
(source: Microsoft)
Step 4: Creating Release Definition with Distribution Group
Creating release definition with a distribution group is as simple as creating it for a normal standalone or a hosted agent. There is just one difference – while agent deployments are run in an agent job, deployment group deployments are run in a deployment group job (delete the agent job if you don’t need it and add a deployment group job):

Picture 5: Adding a deployment group job
(source: Microsoft)
Before adding tasks, we need to click on the Deployment group job and set it up. Here, you select Deployment group and Required tags which can be set on Deployment group details page for each machine (agent) in the group. Since many machines can be added to the same deployment group, tags are a really nice way of filtering out wanted machines.
/DevOps-Behind-the-Rows-How-to-Automate-Deployment/pic-66-(1).png.aspx)
Picture 6: A setup of a deployment group job in release definition
(source: Microsoft)
As you can see, the deployment group job has its own release tasks, very similar to the agent ones. In our case, we used Windows Machine File Copy to copy build artifacts to a backup folder,
SQL Server DB Deploy task to deploy
database,
SQL Server Reports Deployment task to deploy reports to reporting service and
IIS Web App Deploy task to deploy our application and service to the IIS.
Step 5: First Automated Deployment Run
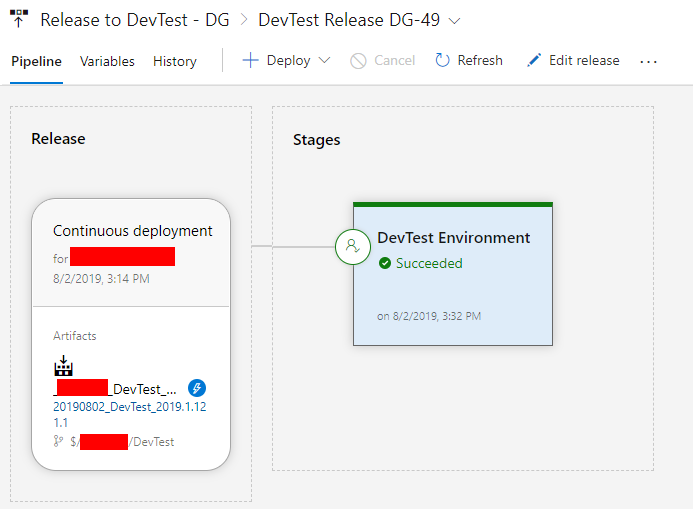
After everything mentioned above is set up, we need to fire that release and check if everything runs without problems. Azure DevOps server shows release logs as deployment runs. Of course, if something is wrong, an error is raised and caught by the deployment group agent, the deployment is stopped and the error is reported to
Azure DevOps server with a detailed red note.

Picture 7: Successful deployment run
(source: Microsoft)
In Conclusion
Automated deployments are a must if you want to keep producing and delivering great IT solutions. It helps not only to save time but in many other fields as well: it supports agile and scrum methodologies; project teams don’t have to spend hours in deployment stage but they can move on to work on new features and their regular duties; clients can see progress easily and give feedback much faster and more frequently. In short, everyone wins!